Get a New Look Without All The Hassle!
Call Us Today! (651) 490-1099
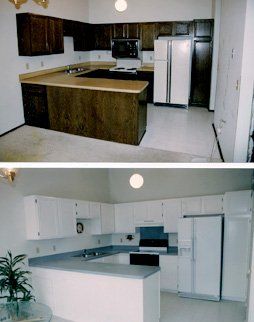
THE PROCESS
The Process
SO WHAT’S THE PROCESS?
STEP 1 SURFACE PREPARATION
Surface preparation is the critical key to obtaining a beautiful finish. We begin by thoroughly cleaning the entire surface to remove grime, soap scum, and stains.
STEP 2 PROTECTION
We strive to treat your home like we would our own, so the actual work surface is taped off, tarps set down, and plastic sheeting is hung to create a spray booth right in your home. Our commercial vent system is put in place to discharge dust and odor to the outdoors.
STEP 3 REMOVAL OF CAULK AND DRAIN
All of the caulk is removed and the overflow and bottom drain pieces are taken off (if applicable).
STEP 4 REPAIRS
The surface is inspected and any repairs are made. This includes nicks, holes, scratches, burns, chips, and rust. Special attention is paid to the drain area, since this is a common area for problems to occur in a tub or shower.
Areas of special interest on countertops include around the sink, along edges where chips generally occur, and the end caps, which may be loose or missing.
Previously refinished tubs will be "stripped" of the old coating in preparation for a new finish, if necessary.
STEP 5 ROUGH IT UP
In order to give the new coating something to "grab onto", it is imperative that the surface is etched, or roughened. This ensures strong adhesion. A chemical etch is applied to hard surfaces such as tile, sinks, or bathtubs. "Softer" surfaces (fiberglass and countertop) are lightly roughened with sandpaper.
STEP 6 CLEAN IT AGAIN!
The surface is again cleaned and re-inspected to ensure that it is ready for the application of the new coating.
STEP 7 MIX AND SPRAY...
A multi-part urethane system is now applied. Color resin is mixed with a catalyst and hardening agents. A chemical reaction occurs, creating the most advanced coating in the industry. This mixture is sprayed on to the surface in multiple light coats to achieve an even, smooth, and attractive finish.
Countertops are often finished with a multi-speck appearance. Multiple "guns" are loaded and sprayed in separate coats to achieve the balanced speck effect. Once the color layers set up, a clear protective coating is applied.
The coating is applied in several light coats using an HVLP (High Volume Low Pressure) spray system.
STEP 8 LEAVE, FOR NOW
Tape and paper are left up to protect the surface until the next day, when we return. The area is otherwise cleared and cleaned, and care instructions left for the resident.
STEP 9 RETURN AFTER 24 HOURS
The following day, we return. The protective tape and paper are taken down, and the area cleaned for dust and debris. If removed, drains are re-installed. Caulking is reapplied.
BEFORE WE ARRIVE:
BEFORE WE ARRIVE:
Please repair leaky faucets and replace missing grout or tiles. If sinks are to be replaced, please have the new sink installed (for countertop only).
Remove shower doors.
Finish any other construction projects in or around the area to be resurfaced. Any loose items in the "spray zone" not in a cabinet should be removed from the room.
If the home is under construction, we require heat, running water, and electricity/lights to perform our work.
Email
Business Hours
Mon:
08:00 AM - 05:00 PM
Tue:
08:00 AM - 05:00 PM
Wed: 08:00 AM - 05:00 PM
Thu: 08:00 AM - 05:00 PM
Fri: 08:00 AM - 05:00 PM
Sat: 08:00 AM - 05:00 PM
Sun: Closed
In Business Since 1994
Languages Spoken
- Spanish